3 Best Duck Decoys on the Market

The best duck decoys will work in your favor with minimal effort, instilling confidence in the ducks that the area you are trying to lure them to is a safe, habitable, and enjoyable environment for them.

Decoys are also meant to reduce the hunter’s need to overcall in order to lure ducks by giving the feel of a natural environment.

When implementing duck decoys into your hunting strategy, plan to assemble a collection of them – potentially up to a dozen or more, and practice setting them up in a realistic fashion.

The more natural your decoy setup, the better it will work, leading to more fowl.

Guy Huntley

Here, we’ll look at three of the best duck decoys on the market.

Top Our Pick For Best Duck Decoys On The Market

Top 3 Best Duck Decoys On The Market

This is my review about 3 duck decoys in the market, it will help you find the best for hunting. Check out it:

1. Greenhead Gear Pro-Grade Duck Decoy, Mallards/Butt-Up Feeder Pack, Pair

Greenhead Gear Pro-Grade Duck Decoy,Mallards/Butt-Up Feeder Pack,Pair

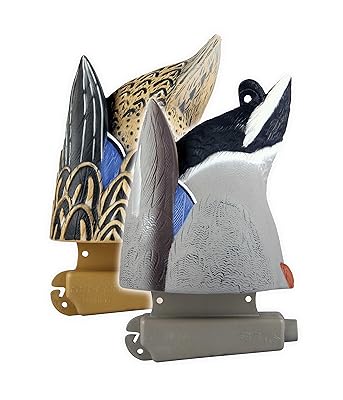
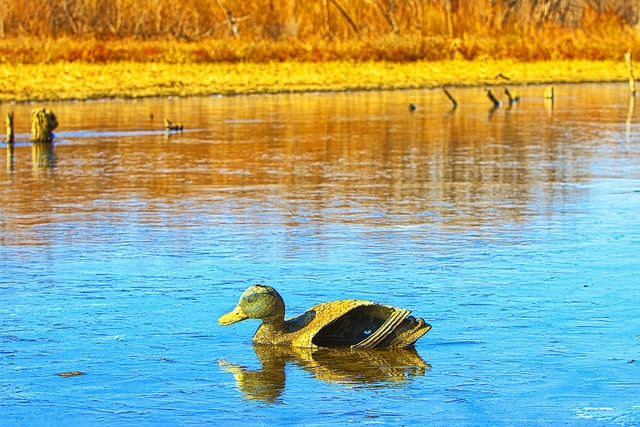
This is one of the most effective duck decoys on the market because it simulates the ducks in feeding position.

This makes it harder to detect as phony and gives the impression of the area being a suitable feeding environment.

Ducks traverse environments seeking safe and popular feeding grounds, and by portraying that image you will greatly increase your odds of bringing them in.

Some great insight on Greenhead decoys can be found here:

  • Minimal movement reduces your chances of losing them out in the water, especially if you rig up a jerk string.
  • Realistically colored and designed, and built to last for a long time.

  • Great appearance in the water, enough to fool the uncanny hunter who hasn’t seen them before

But there are a couple down points:

  • I’ve heard about leakage issues. While this is likely a rare defect or result of misuse, be careful to follow installation instructions.

  • Butt-up feeders don’t resemble the full duck and must be used alongside other types of decoys.

Overall, these are a great addition to your decoy collection and help complete a well-rounded decoy scene.

2. Mojo Outdoors Teal Duck Decoy

Mojo Outdoors Teal Duck Decoy

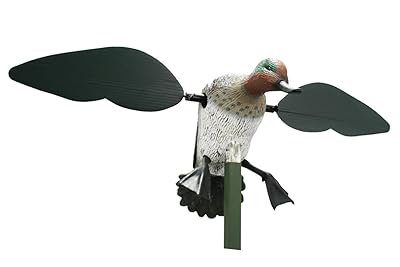
The Mojo Outdoors decoy is a master of its intended purpose: luring in fast-moving fowl.

This is the best spinning wing duck decoy on the market. The wings spin incredibly fast and will catch the attention of nearly any ducks moving through your hunting area.

Mallards, teal, gadwall, pintails, and other ducks are attracted to the ‘strobe effect’ created by the wings and are likely to have the interest piqued enough to check out the situation. Here are the best things about this duck decoy:

  • Single speed and simple operation are If you encounter and issues, replacement wings are readily available online and at outdoors retailers.

  • Despite the three-piece support pole, this duck decoy is surprisingly light weight. For me, that was a big selling point because I already have a large collection and didn’t want to add much weight to it, but it compacts well for transport and storage and makes it one of the best duck decoys
  • Batteries last for several hours, so there is no need to replace them in the middle of a day hunt. They claim 16 hours, and I have no reason to argue with that.

There are a couple of improvements that could be made for future models, such:

  • Making the wings easier to screw off. After a long day in the blind, the last thing I want to deal with is prepping for storage, and this decoy can take a few minutes.

  • The wings are built with thumb screws instead of magnets. While this makes it more durable, it also (at least to me) appears to make it slightly less realistic and modern.

3. MOJO Outdoors Baby Mojo Mallard Duck Decoy

MOJO Outdoors Baby Mojo Mallard Duck Decoy

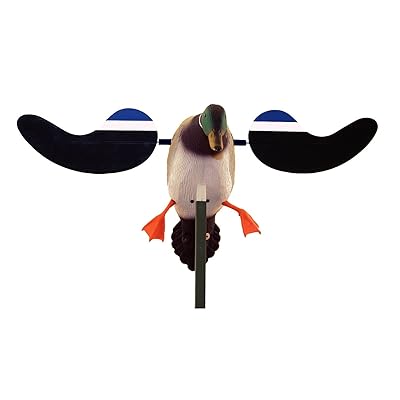
Mojo has another strong offering here with the Mallard Decoy.

This is another great addition to your arsenal of action-depicting decoys because it gives the appearance of a curious duck coming in to peruse a new feeding ground or piece of terrain.

When spread, this decoy is about 20 inches wide, starkly resembling a green head. Because it looks as though it is landing on water, if you set it up to your left, other birds will want to land in front of it and thus will be coming down right in front of you.

Here are the things I like best about this decoy:

  • Batteries last for several hours, so there is no need to replace them in the middle of a day hunt. They claim 16 hours, and I have no reason to argue with that.

  • The battery can be charged in your truck with disassembling the product.

  • The wings on this baby are a magnet, so no screwing and unscrewing are

  • The legs can be taken off, a feature unique to decoys like this. I personally like to keep them on, but depending on the location of your setup it may suit you better to remove them

On the downside:

  • Magnets can come unattached, especially during high wind. Be sure you have aligned the wings correctly onto the magnetic part to minimize the chance of this happening

  • Don’t use it in salt water as it will rust the product after time. Just something to be aware of if you plan to be a long-term duck hunter.

Head To Head Comparison Of 3 Best Duck Decoys

My favorite product here is the MOJO Outdoors Baby Mojo. I’ve never had a decoy so effective at drawing in birds to land right in front of it. While all three of these are different and are a great addition to your hunting setup, this one is the best buy. I recommend having a couple of them set up with one closer to you and the other further away. Throw a couple of Greenhead Pro-Grades in the water along with some generic duck decoys on top of the water, and you’ll have a great setup. Here is my guide about how to set up duck decoys, read carefully before you do it.

Conclusion

Using the best duck decoys has greatly improved my hunts. I’m able to lure in more birds and be more specific about where they are coming down (hopefully right in my line of sight!) and the results have been incredible. If you found this article helpful, please share on social media, and let’s get a conversation going in the comments.

How to Set Up Duck Decoys for More Effective Hunting

Now that you have put together a collection of duck decoys, the obvious question comes up: How to set up duck decoys and decoy spreads.

This is where the artist in you gets to come out, as you develop a strategy to create a spread that optimizes both the surroundings and your collection.

Here in this article, we will look at the basics for how to set up your decoy spread, what to look out for, and I’ll re-emphasize the importance of patience.

How to Set Up Duck Decoys the Best Way

These are the basic introductory steps:

1. Identify your surroundings.

If you’re hunting in a swamp or shallow water basin, keep everything as versatile and mobile as you can. Don’t make it hard to break down and pack out. Keep your ducks clean and shiny to maximize realism. If you are setting up a permanent spread, try to create a scene. Place your decoys where you have seen ducks congregating in the past, and don’t just focus on one area. Get the whole spread as thorough as you can using a couple of hundred decoys, if possible.

2. For non-permanent spreads, use light-weight anchors.

In swamps and shallow backwater, you won’t need more than 6oz anchors. Or, use over-the-head anchors or neck ring anchors. For larger bodies of water, upsize to 12-16oz neck rings or over-the-heads.

3. Make your mallards a prominent attention-grabber.

Mallards are the universal duck, found in many locations and known to socialize with other species. Thus, having your mallard decoys spread around isn’t going to intimidate approaching ducks (in fact, it should help draw them in). When planning how to set up a duck decoy spread, start here.

4. Then, place pintails and black ducks.

The white tails and all-black bodies add another touch of realism to your display. Place them in highly visible areas, preferably around the perimeter of the spread with one or two in the center. These are the two primary decoys you should employ in addition to the mallards. Unless you already own other decoy species, don’t worry about obtaining them because you’ll get the added attention-grabbing out of pintails and black ducks.

5. For permanent spreads with high visibility, use standard size decoys.

They are easier to pack in and set up. Because the ducks will see the spread as they approach, there is no need to use larger decoys. Save these for low-visibility spreads. While you’ll want to have some ducks in clusters, be sure to spread ducks out throughout the available area so that approaching fowl will be enticed no matter the direction, height, or angle they are approaching from.

6. Use the most attractive decoys to lead into the preferred landing zone.

This should be set up so that you’ll have maximum visibility from the blind or shooting spot without having to move and potentially scare the ducks.

7. Put a line of ducks on a log.

Then, float the branch out into the water (with a jerk string to pull it back in). Ducks love to lounge on floating logs, and a bit of an active touch like this can really increase the attractiveness of your spread. Leave space on either end of the setup for incoming ducks to land – try to leave enough room for a few ducks, so that the approaching fowl has plenty of space without overcrowding.

8. Use wing-spinners and butt-up feeders.

These help your spread touch on as many triggers of a duck’s senses as possible. Feeding, flying, resting, and calling (of course you still need to be a good caller!) will help make your spread irresistible.

Additional Thoughts About  How To Set Up Duck Decoys

californiadfg

Remember, always keep a positive attitude! No matter how good your spread is, some days the ducks just aren’t going to bite. The important thing is not to let this get you down, or to think you aren’t good enough to attract them. Even the best big league hitters have a slump now and then, and it isn’t because they aren’t working hard.

Part of hunting is luck and the mood of the fowl. If you catch them on the right day, your learning how to set up a duck decoy spread will be the icing on the cake luring them into your arms.

After setting up your spread, hunker down and wait. Be patient, bring beer and lunch, and accept the fact that you’re working on their schedule, not yours. Be prepared for periods of overwhelming activity as well as periods of mind-numbing boredom (that’s what the beer is for!).

Conclusion

Setting up a duck decoy spread is a fun and worthwhile activity, and if it’s your first one you still have the benefit of feeling it out and seeing what works for your setup. Remember- don’t get discouraged. Do some rearranging and try slight alterations. If you enjoyed this article, please share on social media and feel free to comment! Let’s get a conversation going.

5 Duck Hunting Dog Breeds You Need to Know

Dogs are man’s best friend, and one of the biggest reasons for that is how helpful they can be during a hunt. Personally, I have a beagle that’s been with me for four years now. There are several options to choose from, much of which is decided by individual preference. Waterfowl hunters, inland bird hunters, and more generic game hunters can all help step your hunting game up significantly. Here are the top five duck hunting breeds to have by your side in the blind.

5 Duck Hunting Dog Breeds You Need To Know

1. Brittany

Craige Moore

If you hunt upland, a Brittany Springer is the best hunting breed you can have. Not only are they great swimmers and incredibly loyal, the icing on the cake is that they are also great listeners.

They are big enough that retrieving a larger duck is no problem, and agile enough that they move around an area quickly and discreetly.

Training a springer is as simple as bringing them on a few hunts and thoroughly walking them through the routine of what they need to do. This breed is particularly strong when compared to others that aren’t as agile in and around water.

2. Retrievers

Tony Mullen

Let’s start with Golden Retrievers. This breed is masterful at both force and blind retrieving, and is smart enough to perform well under pressure (in a competition, or in time-sensitive or crowd-sensitive areas). Golden retrievers are impeccable swimmers, runners, and might be the most loyal dog you’ll ever encounter. If I didn’t have my beagle, I’d have one of these. Other retrievers, such as Chesapeake Bay Retrievers, are honorary mentions here. Here is a video that goes into detail on this:

https://www.youtube.com/watch?v=cxPyMMPoe3g

Next, let’s talk about Labrador retrievers. The distant cousin of golden retrievers, these dogs are also incredibly versatile in the field. It often seems like they prefer water over land, which is perfect for duck hunting. It’s important to begin training retrievers early in life, because they have immense amounts of energy and need the discipline to be engrained from a young age in order to be effective. But once they’re trained, you won’t find a better hunting dog than a retriever. Here are more top retrievers to consider.

3. Beagle

Tony Mullen

Now, I don’t want to sound biased here, but Beagles have a connection with humans that is incomparable. Their scent-tracking abilities on the hunt are second to none. They are so fast and can dart around through bushes and shrubbery in a way that larger dogs can’t. I’ve never seen a duck retrieved so fast as what a Beagle will do every time. I also advise starting training when the Beagle is young. The earlier that they get the scents down, and are used to retrieving ducks, the better they will be as adult hunting dogs.

4. Cocker Spaniel

Aero Pixels

Here is one of the best duck hunting dog breeds, simply because they were bred to hunt from the beginning. With quick movements and a keen eye (and nose!) for fallen fowl, it’s no wonder Cocker Spaniels are such commonplace in hunting fields across the world. These dogs necessitate less training than other breeds that have a more difficult time paying attention. A few runs through of the routine, and Cocker Spaniels will be begging you to take them out hunting nearly day. It is more effective when using with best duck call for beginners.

5. Poodle

Koji Ishii

Far beyond the showrooms of dog competitions are the poodles actually doing what they are best at.

These dogs are fiercely loyal, incredibly smart, and not afraid of anything.

Send your poodle into the water, across a field, through a bush- as long as it will feel valued and rewarded upon returning with the bird, the dog will outperform any other. Just remember, toy poodles and other smaller breeds aren’t going to cut it. You must have a full-size poodle and be willing to put in the training time to get it up to speed. Because they are so smart, poodles are more alert than most other top duck hunting dog breeds and therefore will pick up on smells and abstract hints that the others would miss.

Don’t believe me? Watch this video:

Conclusion

While there are a number of great breeds, these are the top 5 duck hunting dog breeds you can have in terms of training, memory, agility, and overall enthusiasm for hunting.

Do you use a breed that I didn’t discuss here? Share a photo and a story here in the comments and let’s get a discussion going.

I hope you found this article helpful, if so please share on social media. Hunting is such a powerful activity, and having a great dog along not only makes it more fun and efficient, it helps with conservation and with promoting the sport as a great way to bond with your best friend.

Hunting Blinds: What to Know and What to Look For

Hunting blinds are a common and effective way that a hunter can shield himself from the animal he is after and minimize the chances of being detected.

Often, a deer hunter will use climbing equipment to perch himself in a tree and use that as cover, but there are several grounded blinds available for purchase that are easy to pack in, set up, and move around while in the field. Some require the hunter to lie down while others allow for sitting and kneeling/standing.

I have been using the Harter’s Ground Blind for several years now with great success. Here, we’ll discuss different types of blinds with examples for you to check out before making a purchase.

Hunting Blinds: What to know and what to look for

  • Deer hunting blinds

    • Portable- Portable blinds are the most common, and work best for most hunters as they can be packed in and out, and moved from spot to spot quickly. They range in size from small to large enough to fit two to three hunters  and have shooting holes built-in. They set up like a tent with stakes and a mesh lining, typically weighing between ten and twenty pounds. A good blind will provide 360-degree shooting capabilities and vision while maintaining disguise from all angles.
    • Permanent- When thinking of permanent blinds, picture a treehouse that a father might build for his kids. Some are made of wood and built on stilts, giving the hunter an extended range of sight, while others  sit on the ground. Permanent hunting blinds will require power tools to assemble, but are durable and will last many years. Permanent blinds are only doable if you own the hunting property, or have an arrangement worked out with the landowner, as they cannot be packed in and out and require an immense amount of labor to put together. Here is a video on setting up permanent hunting blinds.

While they are more comfortable and can be modified to your specific setup and preferences, it’s quite an investment. Some require the purchase of an elevated hunting tower to serve as the base of the blind pod. If you are looking into buying a permanent hunting blind for your property.

  • Tree stand blinds

These are often not much more than a skirt to go around a hunting chair or platform already built into the tree. The benefit of these hunting blinds is that they provide an elevated viewing and shooting area. You will need additional gear to climb the tree and to set up a seating area. Be sure you have fastened the skirt on securely before setting up shop, especially if it’s windy outside.

  • Duck hunting blinds

Duck hunting blinds are similar to deer hunting blinds but designed for waterside landscapes. Often they are designed to look like the tall reeds and plant life that waterfowl thrive in, and feature wider shooting holes that often run the length of the tent’s long side. Around fifteen pounds in weight, give or take, duck hunting blinds are quick to set up and break down.

However, you can build your own duck blind by building a pit deep into the ground using boxes that are built to resemble a 30-gallon oil drum that has been shaped into the landscape. Be sure to put a wooden cover on it so that it won’t fill up with rain when not in use. Again, this is only effective if you are always hunting the same spot.

Conclusion

Personally, I refuse to hunt without a blind, mostly because in addition to camouflage they also provide shelter. You can bring a cooler of beer, food, and other necessities for the hunt and keep it hidden away, and if it rains or is very windy you’ll have protection from the elements.

I don’t own land, so my hunting is done on public land where I have to truck in my blind each time, so I try to keep the process simple by using a tent-like blind with a hunting chair and always bring a blanket. While I’ve always been partial to Harter’s, Ameristep makes many quality products that are affordable and easy to set up.

Have ideas or product recommendations? Share here in the comments and let’s get a discussion going, and don’t forget to blast this article out on social media if you’ve enjoyed it.

3 Best Duck Call for the Money — Reviews

Now that we’ve covered the basics of duck calls, you should have an idea of what is the best duck call for your situation.

Duck calls emit different noises based on how they are used, and take practice to master, but are the single most effective hunting accessory for increasing your chances of bagging a duck.

I’ve used many different calls over the years, and have compiled my favorites in this list. Obviously, I’m a big fan of Duck Commander. Their products have been the most consistent and well-rounded that I’ve ever used.

Here, we’ll take a look at three of their best duck calls and their pros/cons, helping you make a decision on which one is best for you.

Best Duck Call Reviews

Things to consider when buying a duck call

  • There are some cheap options out there, but many of these will stick and become clogged with spit very quickly, leaving you high and dry just when need to make that killer call. By spending a little more upfront you’ll save time and stress immediately, and money down the line as you won’t have to buy a replacement very often
  • Consider the type of duck, the length of hunting days/trips, and experience level of the hunter before making a purchase. I strongly recommend a two or three reed duck call for most circumstances, although there are some decent one reeders

Top Our Pick For Best Duck Call For The Money 2017

Top 3 Best Duck Call For The Money 2017

This is my review about 3 duck call for hunting, it will help you find the best for the money. Check out it:

1. Duck Commander- Triple Threat- Duck Hunting Call New

Duck Commander ~ Triple Threat ~ Duck Hunting Call New

This three-reed device is ideal for two groups of hunters – beginners who need multiple reeds to practice the pitch, and experienced hunters looking for multiple calls to track a mallard hen.

The system is easy to learn and tune, ideal for camping and long days out in the field. Because the call is so easy to blow, it doesn’t require much practice before actual use It’s consistency and accuracy make this call an industry standard because as it holds a tune with little maintenance.

I recommend cleaning out the spit every few hours to prevent the call from sticking and clogging. Also, be careful of blowing too hard – this can make a high-pitched squeal sound that will annoy both you and the ducks.

If you’re in the middle of some action and it starts sticking, try using different reeds because odds are that only one or two of the reeds will be sticking and the others will work just fine.

This can also happen during cold weather, so do your best to apply some body heat to the call when not in use. It works well in rain, unlike many calls. That’s the benefit of buying this call instead of a cheaper one, it has more durability and versatility.

2. Duck Commander Wood Duck Call

Duck Commander Wood Duck Call

First and foremost, this best duck call for the hunting is meant to emulate the ‘wood duck’, it is not made of wood. It’s made of durable plastic and intended to be very specific. Hence only one reed. As far as versatility, this is not the best product, but if you’re going after ”woodies”, it’s call is incredibly accurate and consistent, you can’t beat it.

Duck Commander is a reputable brand that has mastered their niche, and it shows with this call. The sound is high pitched and replicates the sounds made by the wood duck as they sit on the water.

It does not require an immense amount of air pressure to call, but you’ll want to be consistent with how hard you blow if you’re calling differently each time the woodies won’t come in.

I frequently tell people to buy this as a gift for children or new hunters, because woodies are so common that they can practice at home or a nearby lake before heading out on a hunt.

3. MOJO Outdoors Baby Mojo Mallard Duck Decoy

Duck Commander Uncle Si Duck Call

The Uncle Si is perhaps the easiest call to blow on the market.

With moderate force, this call is extremely loud and great for big lakes or wide open areas. The volume level also makes it best duck call for beginners, because it doesn’t take much practice to perfect. If you are hunting in an area where there may be other noises (from animals or otherwise), this is a great call because the ducks will be able to hear it no matter what. It’s raspy, giving it an authentic flare that will beckon to ducks anywhere in the nearby vicinity.

What makes this one of the best duck calls is that you get exactly what you pay for. A sharp call, that is easy to clean and performs well in all types of weather. You’ll be replicating the call made while the duck is sitting, attracting it in to your decoys.

Because it is a single reed duck call, it can become clogged with spit, but it’s easy to clear out and only takes a moment. If you are a collector of duck calls or have several of them on a lanyard, the Uncle Si duck call is definitely a good add-on.

Duck Commander makes their products in Louisiana, meaning they are built with American quality and standards and will ship quickly. It comes apart easily, which is good when cleaning but just be sure it is secured when you’re out in the field so as to avoid having issues.

Head To Head Comparison Of 3 Best Duck Call

These three Duck Commander calls are diverse, and best for different situations. I’ll break those down real quick here:

  • Use the Triple Threat for chasing mallard hens. Master, it’s three reeds and enjoys its versatility in the field. This is the best duck call for experienced hunters who have a routine down.
  • Use the Wood Duck for practice, and generic field uses. It’s also a great gift because any duck hunter will be able to find a use for it. No duck call collection is complete without a wood duck call.
  • Use the Uncle Si for big lakes and the wide-open spaces that surround them. It’s great for beginners and louder situations.
  • Overall, the best duck call reviewed here is the Triple Threat. It offers features that the other two don’t, putting it in a class full of calls that are much more expensive than this one. Also, it will last a long time. Because these products are made in the USA, if you buy now it will be yours within a week’s time. This is good duck call from Duck Commander or otherwise.

Conclusion

The best duck calls are the ones that you can count on to perform even in inclement weather, bringing ducks in quickly. A good call will bring them right to you. I’ve used the Triple Threat from my back porch and had ducks walking right up through the lawn.

You can learn how to use a duck call to know about it.

Don’t overuse the call, study what the ducks do and replicate it. I’d like to hear about your favorite duck calls, please post here in the comments so we can keep this discussion going! If you found this helpful, please share on social media as well. Thank you!

Learn How to Age a Deer in the Right Way

As an experienced hunter, one thing I’ve worked hard at improving over the years is knowing how to age a deer.

We all want to shoot the biggest buck possible, with the best set of antlers, and with years in the field comes the wisdom to which age class a deer is part of.

I manage a small whitetail property, and the last thing I want to do is take out all of the 2 ½-year-old bucks before they age and reach prime antler range. Here, we’ll discuss tips on how to age a deer.

And i wrote a article about how to find a deer sheds, it is helpful, let's read it.

How to age a deer

1. Young bucks (1 ½ years)

You can tell a young buck as their antlers won’t extend past the ears. They also tend to have a slim, tight body shape as judged by looking at their belly, and at the fact that during the rut they won’t have a bulky Here are some great photos of deer in different age ranges

Take a look at the body size. If it looks about average and has only those small antlers, it’s a young one. The tarsal glands will appear fresh and clean, along with the buck’s facial features.

Its stride may appear a bit clumsy and nervous as well

2. 2 ½ to 3 years

This is the age when it can be a bit confusing because the deer’s body size is approaching what it will be for the remainder of its life. Here’s a hint: look at its belly.

How close it hanging to the ribs and organs? At 2 ½ years, it will still appear thin and youthful. The buck’s movement and stance may still appear a bit awkward and frail, as it hasn’t yet acquired a life’s worth of muscle

Without looking at the antlers, if the buck looks like a full-grown doe but not quite an adult buck, you’re dealing with a buck in the 2-3 year range and its best to let it walk.

I encourage hunters to give themselves that extra second before shooting to look at the antlers and body shape, whenever possible, in order to spare the young ones and make sure they are bagging a trophy. Here is a video about aging deer in the wild:

3. 3 ½ to 4 years

At this point in the buck’s life, it is beginning to develop defining muscle characteristics and appear as a full-fledged adult.

The neck is beginning to swell during the rut and tarsals will show some wear and tear. The stomach will begin to sag a bit, and the neck will begin to meld itself into the shoulder with muscle in a noticeable fashion.

It’s stance and movement have stabilized and are beginning to resemble that of an older buck

The best way to tell if the buck is in this age range is to look at its rack and body characteristics.

Size wise, it will appear older and more fully developed, but by honing in on specific features a hunter can tell that this animal still has a couple years to go before its fully ready

4. 4 ½ years

By this point, the rack and body are developed to the point of resembling a fully aged buck.

When learning how to age a deer in this range, look at the legs first. Instead of the frail and weak stance of younger bucks, those in this age range will feature muscle and strength in their legs and stance, which will also be reflected in their noticeably intentional movement.

The stomach has begun to sag quite a bit, and the entire body weighs enough that the buck will appear to lean backward or have to settle itself when standing still

5. 5 ½-year-old bucks (Primetime!)

This is what we’ve been waiting for, and the reason why we pass on younger bucks.

Take photos of the buck, particularly its developed rack and fully shaped body. A buck that is this old will likely have a full-fledged pot belly and legs that are stocky enough at the top to resemble those of a much less agile creature. 

And the best way to have good target let's use best shooting sticks for hunting.

At this point, you’ll want to take your shot whenever you have the opportunity.

Look for a bulbous nose, muscles protruding the entire body and loose skin. Their movements are direct and well thought out, making these bucks quite a prize for those of us lucky enough to find one

    Conclusion

    Just writing about older bucks gets me excited for hunting season. Discussing how to age a deer is one of my favorite pastimes, and I look forward to hearing your thoughts in the comments.

    I am a stickler for ethical and educated hunting, and always encourage the sharing of valuable educational materials. Best handgun safe is recent my post to tell you 5 gun safe to storage your gun safety, check it out.

    With that in mind, please share this article on social media if you found it helpful. Remember, next time you’re in the field, take that extra moment to appreciate that you are hunting an aged buck and let the younger ones scurry along. It benefits us all in the end.

    How to Use a Duck Call for Beginners

    Using a duck call allows for a bit of artistic improvisation in your hunting game.

    As a reed-based instrument, duck calls take practice to master but are one of the most effective ways to call waterfowl into your hunting area and increase your chances of a successful hunt. It should be treated like a musical instrument – experience and knowledge of how it is built and how it works will help you get the proper pitch.

    By combining these tips with plenty of practice, you’ll have a solid grasp on how to use a duck call for the beginners. And you should have the best duck call for the money to use these tips.

    How To Use A Duck Call For The Beginners: Step By Step Guide

    • Know the instrument. There are three main types of duck calls: wood, polycarbonate, and acrylic. While all basically doing the same thing, each takes its own tweak to get the perfect call as they each emit slightly different sounds. For example, wood duck calls make soft, appeasing noises very easily, and are the best way to attract a duck’s attention if you can’t see them or are a beginner. Wood calls work best in optimal weather, especially if you are using decoys. Acrylic calls emit a higher pitched, sharp noise and take more practice to master.

    That said, they are much more effective in situations where the sound is disturbed by factors such as the wind, cliffs, or long distances.

    They will last for a long time, and are easy to clean, unlike wood calls. Finally, polycarbonate duck calls are like a cross between the two. As far as cleaning, maintenance, and learning curve, they are similar to acrylic calls, but the general noise they emit is closer to that of the wooden duck calls. A great sarcastic take on this can be found here.

    • Hold and blow the right way. A common mistake made by beginning duck hunters is that they whistle into the call instead of blow. The object is not to add any of your own influence into the call, make it as natural as possible, and a whistle throws everything off. Blow thoroughly and forcefully into the chamber and the noise emitted will be much more realistic. Also, be sure you hold the instrument by the sound chamber with pinky and ring fingers around the hole . This is the best advice I can give on how to use a duck call.
    • Know what you’re after. There are different kinds of ducks, and they make different sounds. Pintails have a different sound than wigeons, who make a different noise than mallards and blue or green wingtails. If you’re calling the wrong variety, you’re going to have a bad time. I suggest loading some duck photos onto your phone to easily identify what you’re spotting in the field.
    • Know the calls. Duck language is more complex than the basic ‘quack’ that is associated with the animal, although this is the basic call and the root of all other calls. Master that noise first, then work on the feeding call, which is more like a ‘taca-taca-taca’ following a short introductory quack. Also, try a ‘KAK KAK KAK’ type noise if trying to bring the ducks in from far away. These sounds signal feeding time and may be taken more seriously than just a quack.

    An extended quack, kind of like “qqqquuuuaaaacccccckkkkkkKKKKKK!” is the sound of a sorrowful, lonely hen, and can be used to draw other ducks in for comfort. But it shouldn’t last more than a couple seconds at the most. When practicing, make each noise separately. Ducks do not link noised together, there is a noticeable pause between each one. Check out this video for examples.

    • Don’t get in over your head. While the ultimate goal of duck calls is always the same (getting you to bag a duck!), there are different instruments for different ability levels. I always recommend that beginners start with a double reed duck call, as it is easier to control the pitch and sound and produces a more accurate call with minimal effort. You’ll notice that double reeds aren’t as loud as single reed calls and take more breath to power. While this may seem annoying, it will help you master the calls and feel more confident out in the fields. I never even tried a single reed until I had called in several hens with the double, and had built up enough confidence that I was posting up in less secure places that needed a louder call.

    When moving to a single reed duck call, you will immediately notice a difference in sound accuracy and projection. Mastering the technique of using single reed duck calls is tough. You have to blow just the right way to get audible noise and it is even more important that you hold the instrument correctly. They are tougher at impulse blows. I recommend getting set up in your location and being quiet for a few minutes before calling (which should always be done anyway) because you may attract attention on your way in. If hunting with another person, I suggest having two different instruments so that it appears there are multiple ducks in the area, I’ve had more success this way than with two people using the same call. That tends to scare ducks off.

    Conclusion

    As a lifelong duck hunter, I could go on and on about tips, but everything you need to know to get started is right here in this article. The satisfaction of bagging your first duck is unparalleled, it really helps you feel like a sustainable human being that is capable of fending for themselves. Read carefully my guide about how to use duck call. And if you can, let’s consider my article about best shooting sticks 2017.

    My last piece of advice is to dress the part- wear your camo and hunting gear, and try to blend in with the environment. I hope this article has helped you if you have tips to add please share them in the comments below, and if you’ve enjoyed reading I’d appreciate a share on your social media accounts. Take care, and good luck out there!

    Featured Image via EastCoastHunting

    5 Things You Need to Know About Buck Rubs and Scrapes

    The foothills of the Rocky Mountains rolling through Wyoming was the location of the most memorable buck scar I saw as a kid, a memory that has stuck with me and turned into a lifelong fascination with the simple activity of a buck rubbing its antlers against a tree.

    It wasn’t until later that I learned how to incorporate buck rubs and scrapes into my hunt in order to track bucks and increase my odds of landing a big one. You can do the same by utilizing these tips that will help you understand what buck rubs and scrapes mean and pick up on the clues they contain.

    5 Things You Need To Know About Buck Rubs And Scrapes

    #1. Bucks leave primer pheromone scent in their rubs.

    • The scent accomplishes many things for the buck. First of all, it can attract does, a particularly effective mating call and flirting strategy of the buck.
    • Along the same line, the scent can hinder the sex drive of younger and weaker bucks. This increases the mating chances of the stronger buck, which can come into play with territorial concerns.
    • The scent also displays the buck’s social status. Larger, more prime bucks leave stronger scents which stimulate does and detract the approach of younger bucks.

    #2. Buck rubs and scrapes help the animal ‘blow off steam’ in different ways. This is very helpful in identifying buck size, age, and location.

    • Rubbing against a firm tree strengthens the buck’s neck and shoulder muscles, making the animal fitter and ready to fight if necessary.
    • It also releases tension and helps a buck relax. It works sort of as an anxiety reliever after a long commute or stressful encounter.
    • Rubbing and scraping marks territory, helping the buck to feel more at home and maintain a sense of control. 
    • Trail rubs are made by bucks that are moving through their home territory, typically between feeding areas and nesting cover. If you see frequent rubs, it may mean the buck spends the majority of its time in that area. Keep this in mind during scouting and your actual hunt. On the other hand, boundary rubs are made before rut, earlier in the season, as a buck is marking his territory. If you are out in early season these make great stand sites, but other than that you’ll have more luck scouting trail rubs later on. Rut rubs occur during peak mating season when the buck’s hormones are at the highest levels. The buck needs to release testosterone and may shred small trees and shrubbery. If you notice this activity and it wasn’t there a few days ago, set up stand because you are in the prime spot!

    #3. As a buck gets older, it rubs and scrapes more often- up to 3-4 times as much as younger bucks.

    • This means that the scrapes you are seeing while hunting likely are the marking of an older buck. This is great news for you! Keep your eyes peeled for similar markings along your route and use them to zero in on the buck’s location and overall territory.
    • Older bucks start rubbing earlier in the year, with bigger marks and more frequent occurrences.
    • All bucks old and young will rub and scrape smaller trees, three or fewer inches in diameter. Young bucks typically won’t scrape larger trees, as this can cause tension and disputes.

    #4. Young bucks don’t have the strategy that older bucks do.

    • Younger bucks have a tendency to scrape and rub without much theme because they are inexperienced and are just trying to mark up as much territory as possible. Older bucks know how to mark an area and identify it as theirs. When you’re trying to get the largest buck possible, pay particular attention to how consistent and numerous the scrapes are in an area.
    • If scrapes are similar but few and far between, the buck is young and won’t be the trophy shot you’re after.
    • Don’t be tricked by one scrape that is inconsistent in a line of consistent scrapes. This is likely caused by a young buck passing quickly through the area.

    #5. What to look out for and keep in mind.

    • Wide open field rubs are likely made early season, and the buck won’t return to that open area until after shooting light is passed. You’ll want to find a nearby area of grazed trees and identify other rubs. These will be more helpful in locating the buck during hunting hours.
    • If you find rubs that are dried up or discolored, they were probably made in a previous year. Don’t spend much time on those because if the buck were still in the area, there would be fresh rubs.
    • Singular and random rubs aren’t going to be very useful during your hunt. Look for connected series of fresh rubs as described above and don’t get too excited the first time you see one. You want a trail, marking over an entire area, not just a one-off.
    • Landing the biggest buck will be done in fall after strong scouting, back rub and scrape tracking, and trial and error. Return to areas of consistent rubbing several times and you will greatly increase your odds of landing that trophy buck!

    Conclusion

    Looking for buck scrapes and rubs is an essential part of fall hunting. When done correctly, this process will greatly increase your chances of making a kill and having something to brag about.

    I suggest doing some web research to get a feel for what these scrapes and rubs look like  and identify lookalikes when out in the field. Another my article best shooting sticks 2018, check it if you need buy a shooting sticks.

    I hope you have enjoyed this article! I’ll be back out in Wyoming each year looking to find the next gorgeous collection of scrapes and rubs. If you found this to be helpful, please share on your social networks. I’m interested to hear your thoughts on this topic – let’s get a conversation going in the comments section, that way we can all learn more tricks of the trade.

    Featured Image via USFWS Mountain-Prairie

    How to Find Deer Sheds

    Although you may have heard otherwise, there isn’t much luck or many secrets about how to find deer sheds.

    What it really takes is patience, a keen knowledge of the trail and habitat, and a bit of hunting prowess. I found my first shed antlers at the age of 11 after my uncle had spent three years instructing and leading me around without any luck.

    It happened because we covered ample ground quickly during the hunt, with our eyes skimming the terrain for noticeable color differentiations. I’ll admit, I felt like a much more legit hunter after snapping a photo with the shed and showing it to my friends (I instantly gained more respect around our small town, too – it’s amazing what a nice trophy does for your reputation!)

    Since that hunt, I’ve collected many sheds and in this article, I’ll break down field-tested tips on the best ways to go about the practice, what to look out for, and what NOT to do when trying to find deer sheds. you can read Whitetail Scouting Tips to know about some my tips.

    What you need to find deer sheds

    • A sharp eye. Rarely will a hunter trip himself over a shed set of antlers. When in the field, keep your eyes peeled just above the tips of the shrubbery for anything sticking up or oddly colored. Instead of darting your eyes around from side to side, take the time to focus on your surroundings and process everything that you see. It should almost feel like you are memorizing the terrain for later reference.
    • Time in the field. Sorry, but your first hunt might not land you anything. Nor the second, While some guys seem to find sheds like your chubby friend finds a KFC, that isn’t normally the case, especially for newer hunters.
    • A sense of place. You have to have an understanding of where deer traverse, where they sleep, and where they are during the critical time of year when shedding happens. This is why your best bet for finding deer sheds is typically going to be on hunts closer to home – you are more familiar with their patterns, you see their migration pattern, you know where they cluster together and where they run free.

    Step-by-step instructions for how to find deer sheds

    • Locate food and water sources. Where are the deer in your area feeding? If there are cornfields or terrain with diverse vegetation and nearby water, those are great places to start. The reason this is number 1 is because bucks spend so much time feeding that your odds of finding sheds near their food source are significantly higher than anywhere else. Clear-cut areas, hard mast areas, places where berries and nuts grow, these are all solid spots to check out. Watch this video to get a good visual of what you should be looking for.
    • Raise a hunting dog. Want an extra pair of eyes and ears? Better yet, a nose that puts yours to shame? A pup provides all of those things. Plus, he needs the off-season exercise. A hunting dog will take after you, so if he sees how excited you get upon finding a shed (even if it’s a staged setup in the backyard) he will crave that attention and recognition. It will take time and a lot of encouragement to get the dog up to speed and teach him what to look for. The easiest way to do this is by ALWAYS bringing the dog with you on hunts, and taking several days during the winter to try and find sheds. Dogs are creatures of habit. Get them excited about something, and they will have a lifelong passion for it. Here is a video explaining how to do this:
    • Find their bedding areas. In the winter, bucks spend a whole lot of time in the bedding areas. Identify south facing slopes in the area because they provide the deer with the maximum amount of sun and warmth, which in addition to keeping the deer warm means that accumulated snowfall is going to be minimized. I remember finding three sets of antlers in one area during a particularly successful mission traversing from the top of a medium hill down the south facing side to a creek at the bottom. This is the ideal winter habitat for deer, with nearby water and food in addition to the extra sun. Down low, there was ample tree cover and a strong thicket of vegetation near the watershed. Tracks and poop were aplenty, and I knew right away that I was on the right track. I’ve returned every year since and get lucky about 75% of the time.
    • Search during late winter and early spring. To be more specific, March and April for whitetail deer are the best months. While I’ve had success in February and early April, your odds are exponentially higher once maximum snowfall and cold temperatures have passed. If you’re looking for mule deer sheds, push everything back one month and begin your search in April. Odds are you can get several good laps in before temperatures rise and deer become more mobile in mid-May.
    • Identify objects that will loosen or pull on the antlers. What causes the antlers to take their final plunge is rough contact with tree branches, thick patches of brush, fences, and other solid objects that deer come into contact with. Last year I found a small antler set literally stuck on the side of a fence post, which the deer had evidently tried to either jump over or charge. You’re not going to have much luck in wide open grassy fields unless you stick to the perimeter, along the side of where objects like the aforementioned are. This renowned expert explains more.
    • Find game trails. Because of reason number 5, game trails can lead you in the right direction. Deer will take the trails coming in and out of thicker areas or heading to water sources, places where they spend a lot of time during late winter. They will likely be feeling relaxed on these trails and trotting leisurely, stopping to look around and check out the surroundings, proving ample time for the antlers to fall off while they are bent over.
    • Find the oak leaves. Now, I’m not sure if this is just my experience or what, but so many times I find the antlers laying on top of oak leaves, looking like a weathered stick. They tend to blend into these situations, so always keep your eyes peeled and move slowly. Take the time to fully analyze everything around you and don’t be afraid to zig zag around to check out promising leads. Lee Lakosky offers some great first-hand advice here.
    • Plan on getting some exercise. Make a day of it. Walk for miles, especially if you find deer tracks or droppings. Bring a lunch, maybe a six pack of beer, and plenty of water. Toilet paper, a map, and even a book can be good to for when you need to take a break. I’m always surprised by the number of people trying to find sheds that aren’t willing to put in any effort. This activity is like everything in life – the more effort you put into it, the higher your chances of success.
    • Look under stand-alone trees. If a deer is out in the field, feels threatened, but has nowhere to go, a lone tree may be shelter to hide under. He may also head there for any berries or food nearby, or to take a rest. This is a tip that not many people know about, so even if you’re in a highly trafficked area you might have found a hidden gem that others haven’t visited. If there are large amounts of leaves around the tree, this is even better. For whatever reason, I’ve always found that deer are attracted to leaves and seem to enjoy walking through them, often scattering them around.
    • Pre-scout! Get to know your target area a little better before heading out, especially if it’s not close to home or somewhere that you visit frequently. Using a topo map, mark the areas where you intend to spend ample time and also include a few backup spots. If you can find a forum online where hunters talk about that specific place, it will be of great help. Ask questions read other people’s comments. The more knowledge you bring with you, the better your chances of success! When shooting a deer, you can use best shooting sticks to improve your result.

    Conclusion

    I hope this guide has given you a good base of knowledge on how to find deer sheds. While this activity is relaxing and not always strenuous, it is becoming increasingly popular because of its accessibility and the satisfaction that comes with finding a set of antlers. It doesn’t take a high skill level and is great for families, so I encourage you to get your crew together and get out there! If you liked this guide, please help spread the word by sharing on your social media accounts. I’d love to hear your stories and tips, please share in the comments below. Thanks for reading!

    Featured Image via Julie anne Johnson

    Get Your Whitetail With 3 Simple Whitetail Scouting Tips

    As a native Nebraskan, whitetail hunting is a sport I’ve been part of, seen, and thought about my entire life.

    I’m fortunate to have taken part in several successful hunts that have landed trophy bucks and have watched the habits of long-time successful hunters. Here in this article, I’m going to share the most proactive whitetail scouting tips from my own experience and from what I’ve observed the most successful hunters doing. A successful scouting expedition is an unforgettable experience and by incorporating these tactics into your approach, you’ll find that tracking and bagging whitetail deer is an accomplishable task.

    #1: Find the right habitat.

    Whitetail deer follow habitual feeding and living and patterns. You aren’t going to see them springing alone across grassy knolls in broad daylight while you sit nearby, ready to ambush. Tracking deer starts with finding their living, grazing, and migrating hubs.

    • The simplest way to go about finding habitats likely to host whitetail bucks is to look for mature hardwood forests. These provide more cover than younger forests, as well as more nutrients and food. Acorns are a great sign – you’ll typically see white oak acorns falling as soon as September, with red and black acorns falling later in the season. Whitetail feed on these acorns and also on surrounding fauna.
    • Places like creek bottoms, clearings within forests, and other spots where the ground is relatively level and dry are places bucks will congregate. If it’s rocky, they will keep moving or avoid the area altogether.
    • In the right areas, you’ll find early scrapes from the bucks. Identify where bucks have marked territory with their antlers, forehead, or saliva, or kicked an area free of leaves and debris with their feet. On travel routes from higher elevations, you should be able to find areas marked by these scrapes as the bucks move towards feeding areas (source here). Find a secluded spot that provides visibility of their movement across the areas and observe what happens over the course of a morning. Not much activity means they may have detected a threat or moved on.
    • I always start by looking for natural and manmade objects that attract deer, perhaps the most basic of my whitetail scouting tips. Power lines, crevasses in otherwise flat terrain, ridges, rivers and streams. I recommend keeping three things top-of-mind during your approach:
      • Do whitetail feel safe here?
      • Can they feed or drink here?
      • What other wildlife is in the area that may drive them away?
    • A good visual of these areas is provided here:

    #2: Locate staging and bedding areas

    Staging areas are where deer wait until after sunset to move into an open field for food. They won’t do this during the day, but signs of their presence are usually visible. They move down from bedding areas, stage themselves 200 yards or less from the target area, and proceed when they feel safe. Look for these signs:

    • Bedding areas are typically found in areas where the bucks rest during the day and where the feed during the night. You will want to look for areas with shade and/or easy access to food, such as orchards, high fauna areas near water, and clover fields. If you can identify game trails you’ll know you are on the right track, follow them towards covered areas or areas with more diverse vegetation than just an open field.
    • The Whitetail Journey Team gives great examples of this in this video.
    • When whitetail approach a feeding or bedding area, they have a ‘prey’ mentality. They stop along hedges and trees up to 200 yards from the area and analyze the situation, usually waiting until dark to head into the open. These ‘staging areas’ can be great places to spot them. Backtrack from the bedding area towards cover and look for signs of presence like droppings, ruffled and nibbled branches/leaves. Here is another video showcasing staging areas:
    • Deer will forage five pounds of food every day. Partially chewed fruit, berries, and leaves are a great sign of recent activity in the area. Fresh droppings are also a good indication. Once you have found food sources and staging areas, you’re ready to find the rub line.

    #3: Use the locations you’ve identified to unravel a rub line

    Now you are ready to make your move. Find the rub line, find your ambush area, and wait. Keep these things in mind:

    • The mature bucks, the ones you really want to be focusing on, will make the first and most noticeable rubs. I usually see this happening in September. When you see a rub mark on a tree, you will know the buck faced that direction as he passed the tree, so head in that direction to find the next rub. You will likely notice some markings of passage from the buck. Once you have identified a line of rubs, mark them on a map so you don’t forget the locations.
    • After you have the line marked out, walk around the area and mark down key ambush spots along the rub line. Where will you have the best shot? Which areas provide the best visibility?
    • For the best whitetail scouting, use a trail camera. You’ll want to place it along the already identified rub line because you know that the deer are already using that route. This will save film and time, and help you identify when the route is being trafficked so that you’ll know when to be at your ambush spots.
    • Get to your spot early. Be very quiet. These seem like obvious whitetail scouting tips, but they shouldn’t be taken for granted. (Early season whitetail scouting is the best time.)

    Conclusion

    These are my tried and tested whitetail scouting tips that helped me land my first buck. Be smart in the field and be aware of your surroundings. This methodology combined with growing experience out in the field will help you be more successful in your hunting and feel more in control as well. I hope you enjoyed reading this and are excited to try the tips on your next!

    I’d love to hear what you think about this article, feel free to comment below and share on social media – the more educated and aware hunters are of best whitetail scouting practices, the more sustainable our sport will be not only for us but for future generations.

    Visit Us On FacebookVisit Us On PinterestCheck Our Feed